If you already have an existing Formulas Online account, and now wish to:
- Request access to COLAs Online and/or
- Add additional permits/companies to your account so you can submit applications for them,
you can do so by making changes to your existing account registration. Once you modify your registration, the changes will be submitted to TTB and, if approved, TTB will update your account privileges.
Follow these steps to modify your registration:
- Log in to your existing Formulas Online account.
Select the “My Profile” link from the menu box:

On the My Profile screen, select “Modify Registration:”

- Your existing user registration will open to the “Company” tab.
- To add a new permit/company to your Formulas account:
- Select “Add” (above “Perjury Statement”).
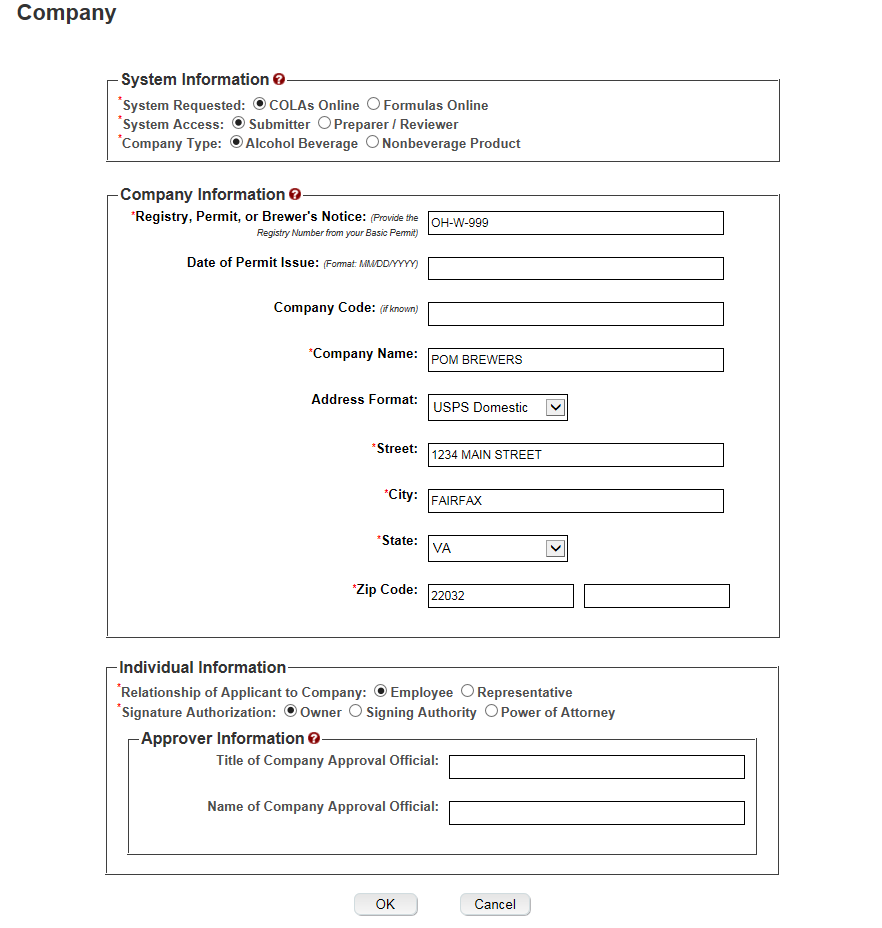
- The “Add Company” modal window will open. Be sure “System Requested” is “Formulas Online,” then fill out the information in the modal window and select “OK.”
- Repeat for each permit/company for which you need Formulas Online access.
- Get tips and tricks to help you fill out the Company tab successfully when adding new permits/companies to your Formulas account.
- Select “Add” (above “Perjury Statement”).
- To request COLAs Online access for a permit:
- Under “Company Detail,” select the type of access from the “COLAs Online System Access” drop-down list, then select “Add.”
- The “Add Company” modal window will open. Be sure “System Requested” is “COLAs Online” (if not, change it), then fill out the information in the modal window and select “OK.”
- Repeat for each permit you need to add to your account.
- Get tips and tricks to help you fill out the Company tab successfully when requesting COLAs Online access.
Note: You will need to complete a separate entry for each alcohol beverage permit / nonbeverage product company and for each system that you will need to access. For example, if you need access to both COLAs Online and Formulas Online for two permits/companies, you must complete four entries in the Company Tab:
- Permit/company #1 access to COLAs Online
- Permit/company #1 access to Formulas Online
- Permit/company #2 access to COLAs Online
- Permit/company #2 access to Formulas Online.
- Under “Company Detail,” select the type of access from the “COLAs Online System Access” drop-down list, then select “Add.”
Company tab:

“Add Company” modal window (which appears after you select “Add”).

Select “Next” to proceed to the “Comments” tab.

- If you need to communicate anything about your registration changes to TTB (optional):
Select “Add” and the Comments modal window will appear. Enter your comments in the available field, then select “OK.”

- Verify that your comment was added on the main Comments tab.
- Notes:
- Select the word “Comment” to edit your comment.
Select the checkbox next to the comment and select the “Delete” button to remove the comment.

- Select the word “Comment” to edit your comment.
- If you need to communicate anything about your registration changes to TTB (optional):
Select “Next” to proceed to the “Docs/Links” tab.

- If you need to add attachments on the “Docs/Links” tab, select “Upload” and the Attachment modal window will appear. (As a reminder, if you are registering for the first time as a Submitter on behalf of a nonbeverage company, unless you are an owner, you will need to upload a signed Power of Attorney or Signing Authority form here.)
- Enter a description for the file in the Description field.
- Select attachment type from the Type drop down.
Note: You must select the correct type. For example, if you selected “Signing Authority” as the Signature Authorization in the Company modal window, you must select “Signing Authority” from the Type drop-down list. If you selected “Power of Attorney” as the Signature Authorization in the Company modal window, you must select “Power of Attorney” from the Type drop-down list.
- Enter a description for the file in the Description field.
Browse and select your file; select “OK.”

- Verify that your attachment was added on the main Docs/Links tab.
- Notes:
- Select the “edit” link to update the attachment information.
Select the checkbox next to the attachment and select the “Delete” button to delete the attachment.

- Select the “edit” link to update the attachment information.
Select the “Validate” button.

Red error messages display indicating any issues found with the user registration submission. Correct any errors and repeat this step until the user registration submission is successfully validated.

Alternatively, a green message displays indicating no issues were found with the user registration submission.

Select the “Perjury Statement” checkbox at the bottom of the tab to acknowledge you have read, understood, and complied with instructions for filing the application.

- Select the “Submit” button. The Submission Confirmation page displays with a submission ID and the modify user registration submission is successfully submitted.

|
TTB will verify the changes to your registration and will contact you by email when a determination has been reached or if additional information is needed. Please keep a keep a record of the submission ID for tracking purposes.
See the latest processing times for user registration submissions.
Page last reviewed: January 15, 2021

